
These are the most common mistakes I see businesses make when it comes to blogging (and how to fix...
In this post, I'm sharing my new Zapier automation that takes your Google Docs, cleans up the code, and creates ready-to-publish drafts in Shopify.
Recently, I ran into a problem with a client.
We publish a couple of high-quality blog posts to their Shopify site every week, and because we have a lot of steps in the workflow, the schedule gets tight.
If you’ve ever pasted a Google Doc into Shopify, you know how much work it is to remove formatting and make it work like it’s supposed to. We had a full SOP with dozens of steps that we outsourced to an agency.
This whole workflow just took too much time and was too prone to errors. So I came up with something new.
In this article, I’m sharing a new automation I created using Zapier that takes a Google Doc, turns it into clean HTML, and then creates a new blog draft in Shopify for the article.
This automation takes what was originally a multiple-day, several-hour process and cuts it down to about 15 minutes.
Warning: This article will get technical! But if you follow the steps, you can set up something similar for your own use case.
By the way, I’m using Javascript as part of this automation, and I’m not an expert. I put it together with ChatGPT and my own knowledge as a former front-end developer. But if any developers find ways to improve my code, please let me know!
How It Works
Here’s the big-picture description of what the automation does:
- I move a card inside of Airtable to trigger the automation.
- Zapier finds the article in Google Drive and exports it to HTML.
- Zapier converts the HTML file into Markdown, then back into HTML. (This creates a clean HTML file without Google Doc formatting.)
- Then I run some custom code on the HTML file to customize the HTML according to the client’s needs.
- Next, I have Zapier save that HTML into a file and upload it to Google Drive.
- At the same time, I set off an automation on my client’s side that creates a new blog post on Shopify that’s ready for me to pop in the HTML and publish.
Next, I’ll break down the exact steps and settings I use so you can recreate it yourself.
Breaking Down the Zapier Automation Step-by-Step
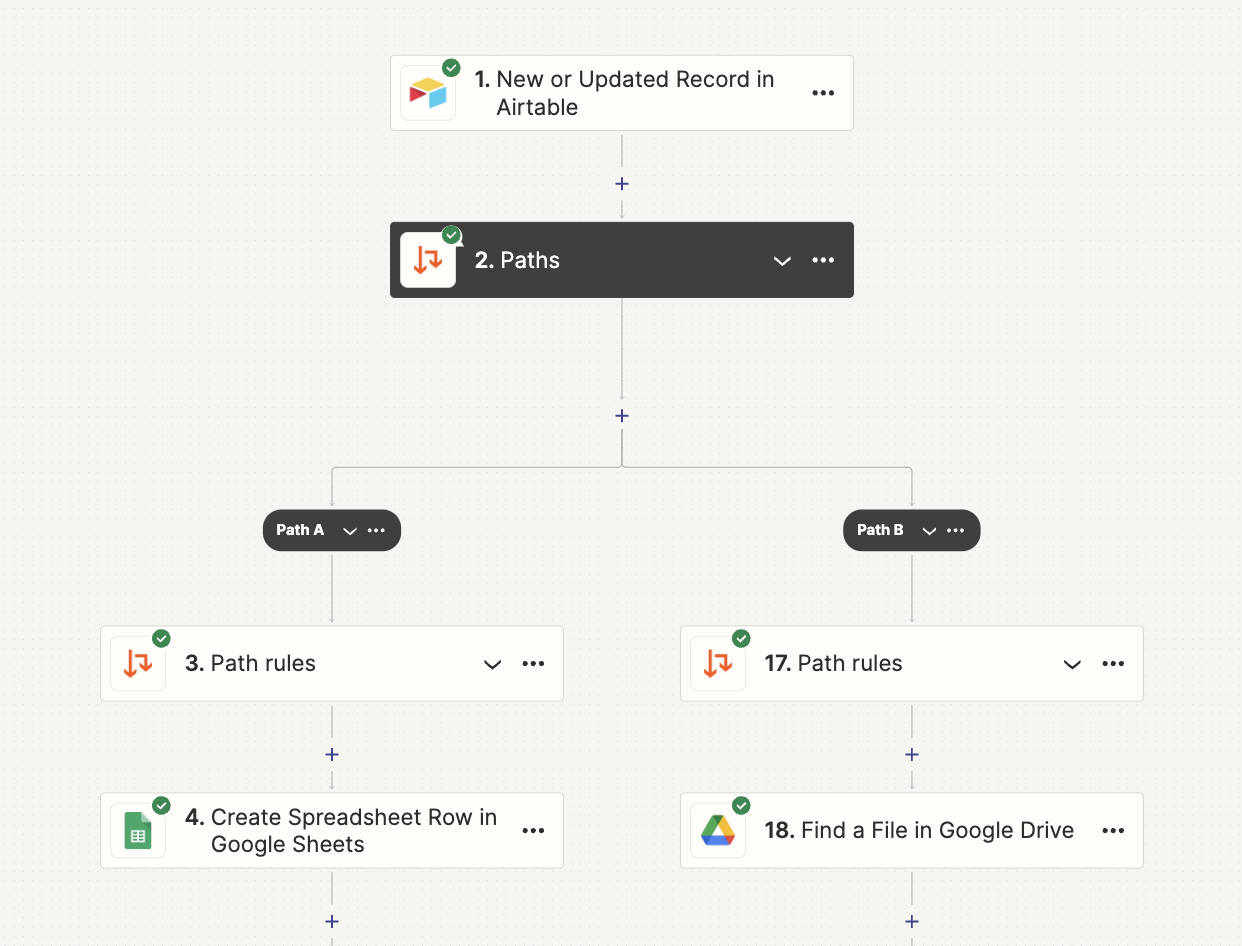
Step #1 – Trigger the Automation from Airtable
First, I trigger the app when I have a New or Updated Record in Airtable. This only works on one view in my Airtable base, which is a kanban view.

Each card in the kanban represents one article, which looks something like this:

When I move a card into the “Ready to Upload” column, it will trigger the automation.
Step #2 – Paths by Zapier
Next, I use the paths app to decide what to do next based on the status of the article. I use multiple paths to create different automations based on the article status.
If you will only create one automation, you can use the Filter by Zapier app instead.
Step #3 – Path Rules
For each path I want to create, I set the conditions. This particular automation will only run when the status is “Ready to Upload.”
Here’s what that looks like:

Step #4 – Create Spreadsheet Row in Google Sheets
Next, Zapier pulls the article information from Airtable and adds it to a Google Sheet.
This is where we trigger the Shopify automation on my client’s side. Since they manage the Shopify account, they’re running the automation on their company Zapier.
I’ll go into detail on how that works in the next section. But for now, this automation is simply adding this information into a Google Sheet:

- Post Title
- URL Slug
- Author
- Blog Post Template
- Meta Description
- SEO Title
- Tags
And here’s how that looks in Zapier:

(You can’t see the whole thing, but I’ve chosen other fields for each heading in the sheet.)
Step #5 – Find File in Google Drive
Next, I ask Zapier to find the article in Google Drive.
It reads the article title in Airtable, then searches inside a specific folder for a document with the same title.
(The title in Airtable and the title of the Google Doc must be the same for this to work.)

Now that I’ve got the file in Zapier, I can work with it in the next steps using the Document ID from this step.
Step #6 – Add File Sharing Preferences in Google Drive
This is a necessary evil when working with Google Drive files using a third-party app. You need to share the Google Doc with anyone who has the link.
This could definitely pose a security issue for some businesses. But it’s highly unlikely that someone will find the exact file, and even if they did, it’s about to be published on your blog anyway. Plus, I manually change the sharing settings back after I’m done.
The setup looks like this:

Step #7 – GET in Webhooks by Zapier
Next, we’ll get the HTML contents of the Google Drive file using a webhook.
I got this idea from this awesome Zapier forum post by CraigNet3.
Here are the settings. (I’m pulling in the document ID from the Find File in Google Drive step.)

This outputs the Google Document in HTML format. It’s not pretty and has many issues, so I’ll clean it up in the next step.
Step #8 – Run Javascript in Code by Zapier
To use this app, choose “Code by Zapier,” then in the Event tab, choose “Run Javascript.”
I’m taking the HTML we just got in the previous step, and adding <strong> tags into the HTML wherever Google Docs has added <span class=”c6”></span> (which means “bold” in Google Docs’ weird way of writing HTML).
ChatGPT helped me write this code, so any developers out there, please let me know if I can make it better.
// Function to insert <strong> tag inside <span> tags with class "c6"
function insertStrongTag(htmlString) {
    // Define a regular expression to find span elements with class "c6" among other classes
    const regex = /<span class="([^"]*\bc6\b[^"]*)">(.*?)<\/span>/g;

    // Replace the matched span elements with the modified version
    const modifiedHtml = htmlString.replace(regex, (match, classes, content) => {
        return `<span class="${classes}"><strong>${content}</strong></span>`;
    });

    return modifiedHtml;
}

// Use the function with the input data
const modifiedHtml = insertStrongTag(inputData.html);

output = {modifiedHtml}
Note: I’m planning to update this to also include <em> tags where text should be italic.
Step #9 – Text in Formatter by Zapier
Now, the easy part. We will take this new HTML from Google Docs and convert it into Markdown.
This will keep all of the content structure, including headers, lists, and bolded items, but it will remove all the weird classes and tags that Google Docs has inserted into the code.
Select the event type “Text,” then under Action, choose “Convert HTML to Markdown” and choose the HTML we got in the previous step.

Step #10 – Text in Formatter by Zapier
This time we are going to take the Markdown and turn it back into HTML, which will give us clean markup for Shopify.
It’s the same thing. Select the event called “Text.” Choose “Convert Markdown to HTML” and input the Markdown we got from Step #9.

Step #11 – Run Javascript in Code by Zapier
More Javascript!
In fact, I’ve split the code into 3 different steps because it was getting too complicated for ChatGPT (and me) to figure out.
Background: I spent 4 years working as a front-end developer in Tokyo (learned on the job), so I know a little bit about Javascript, but I was more of an HTML/CSS girl anyway.
For Input Data, I selected the output from the previous step (the HTML code converted from Markdown).

What I do in this step is add a custom ID to each <h2> and <h3> so I can create a Table of Contents later. The ID is created from the text in the heading, with special characters and numbers removed, so each heading gets a unique ID.
Note: I do this because Shopify doesn’t have a good way of adding a Table of Contents automatically yet. So we do this by hand.
Here’s the code:
// Helper function to convert text to Title Case, remove spaces, and remove non-alphabetic characters
function toTitleCaseNoSpaces(text) {
    return text
        .replace(/\w\S*/g, function(word) {
            return word.charAt(0).toUpperCase() + word.substr(1).toLowerCase();
        })
        .replace(/\s+/g, '')
        .replace(/[^a-zA-Z]/g, ''); // Remove non-alphabetic characters
}

// Function to process HTML without link functions
function processHtmlWithoutLinks(htmlString) {
    // Define regular expressions for <h2> and <h3> tags
    const headingRegex = /<h2>(.*?)<\/h2>|<h3>(.*?)<\/h3>/g;
    const productStartRegex = /<p>\s*\[product/i;
    const productEndRegex = /\[\/product\]\s*<\/p>/i;

    // Replace the matched h2 and h3 elements with the modified version
    let modifiedHtml = htmlString.replace(headingRegex, (match, h2Content, h3Content) => {
        const content = h2Content || h3Content;
        const id = toTitleCaseNoSpaces(content);
        if (h2Content) {
            return `<h2 id="${id}">${content}</h2>`;
        } else {
            return `<h3 id="${id}">${content}</h3>`;
        }
    });

    // Remove one <p> tag before [product and one </p> tag right after [/product]
    modifiedHtml = modifiedHtml
        .replace(productStartRegex, '[product')
        .replace(productEndRegex, '[/product]');

    // Remove blank lines
    modifiedHtml = modifiedHtml.replace(/^\s*[\r\n]/gm, '');

    return modifiedHtml;
}

// Use the function with the input data
const modifiedHtml = processHtmlWithoutLinks(inputData.html);

output = {modifiedHtml};
Step #12 – Run Javascript in Code by Zapier
This time, I’m going to clean up URLs in the HTML, because Google apparently inserts a tracking code in every single link (thanks Google) when you export from Google Docs.
Here’s the input again, pulled from the last step.

And here’s the code:
// Function to decode HTML entities and URL-encoded characters
function decodeHtmlEntities(str) {
var entities = {
'&': '&',
'<': '<',
'>': '>',
'"': '"',
''': "'",
'%3D': '=',
'%26': '&',
'%25': '%',
'%2B': '+',
'%5B': '[',
'%5D': ']'
};
return str.replace(/&|<|>|"|'|%3D|%26|%25|%2B|%5B|%5D/g, function(match) {
return entities[match];
});
}
// Function to clean up URLs by removing the Google redirect prefix and everything after &sa=
function cleanUrl(url) {
var googlePrefix = 'https://www.google.com/url?q=';
var googleIndex = url.indexOf(googlePrefix);
if (googleIndex !== -1) {
url = url.slice(googleIndex + googlePrefix.length);
}
var saIndex = url.indexOf('&sa=');
if (saIndex !== -1) {
url = url.slice(0, saIndex);
}
return url;
}
// Function to extract URLs from <a> tags in HTML
function extractUrls(htmlString) {
var urls = [];
var regex = /<a\s+[^>]*href="([^"]*)"[^>]*>/gi;
var match;
while ((match = regex.exec(htmlString)) !== null) {
urls.push(match[1]);
}
return urls;
}
// Function to replace new lines with spaces in the entire document
function replaceNewLines(htmlString) {
return htmlString.replace(/\n/g, ' ');
}
// Function to remove spaces inside href attributes
function removeSpacesInHref(htmlString) {
return htmlString.replace(/href="([^"]*?)"/gi, function(match, url) {
var noSpacesUrl = url.replace(/\s+/g, '');
return `href="${noSpacesUrl}"`;
});
}
// Function to remove spaces between tags that are directly inside the <body> tag
function removeSpacesBetweenBodyTags(htmlString) {
return htmlString.replace(/<body[^>]*>([\s\S]*?)<\/body>/i, function(match, bodyContent) {
var cleanedBodyContent = bodyContent.replace(/>\s+</g, '><');
return match.replace(bodyContent, cleanedBodyContent);
});
}
// Function to extract, clean, and replace URLs in HTML
function extractCleanAndReplaceUrls(htmlString) {
// Decode HTML entities and URL-encoded characters
var decodedHtml = decodeHtmlEntities(htmlString);
console.log('Decoded HTML:', decodedHtml);
// Extract URLs from the decoded HTML
var extractedUrls = extractUrls(decodedHtml);
console.log('Extracted URLs:', extractedUrls);
// Create a map of original to cleaned URLs
var urlMap = {};
extractedUrls.forEach(function(url) {
urlMap[url] = cleanUrl(url);
});
// Replace the original URLs with the cleaned URLs in the HTML
var updatedHtml = decodedHtml.replace(/<a\s+[^>]*href="([^"]*)"[^>]*>/gi, function(match, url) {
var cleanedUrl = urlMap[url];
return match.replace(url, cleanedUrl);
});
return updatedHtml;
}
// Step 1: Replace new lines with spaces in the entire document
var updatedHtml = replaceNewLines(inputData.html);
// Step 2: Extract, clean, and replace URLs in the HTML
updatedHtml = extractCleanAndReplaceUrls(updatedHtml);
// Step 3: Remove spaces inside href attributes
updatedHtml = removeSpacesInHref(updatedHtml);
// Step 4: Remove spaces between tags that are directly inside the <body> tag
updatedHtml = removeSpacesBetweenBodyTags(updatedHtml);
output = {updatedHtml};Step #13 – Run Javascript in Code by Zapier
In this step, I use Javascript to add a link title to each link so I don’t have to do it by hand. The link title is the same as the link text. That would look like this:
<a href=”www.google.com” title=”Google”>Google</a>After that, I go through every link and check if it’s on the client’s domain or not. If it’s an external link, we change it to open in a new window and add rel=”nofollow”. That would look like this:
<a href=”www.google.com” title=”Google” target=”_blank” rel=”nofollow”>Google</a>Here’s the code I’m using. I switched out my client’s domain with google.com to maintain privacy. So to use this for your own domain, just replace “google.com” with your URL.
// Function to decode URLs
function decodeUrl(url) {
    try {
        return decodeURIComponent(url);
    } catch (e) {
        return url; // Return the original URL if decoding fails
    }
}

// Function to fix URLs by decoding and reformatting
function fixUrl(url) {
    // Decode the URL first
    let decodedUrl = decodeUrl(url);

    // Remove any unwanted line breaks or spaces
    decodedUrl = decodedUrl.replace(/\s+/g, '');

    return decodedUrl;
}

// Function to extract attributes and content of <a> tags
function extractLinkDetails(htmlString) {
    var linkDetails = [];
    var regex = /<a\s+([^>]*?)href="([^"]*?)"([^>]*?)>(.*?)<\/a>/gi;
    var match;

    // Process <a> tags
    while ((match = regex.exec(htmlString)) !== null) {
        var preAttributes = match[1].trim();
        var url = fixUrl(match[2]); // Use fixUrl to fix the URL
        var postAttributes = match[3].trim();
        var content = match[4];

        linkDetails.push({
            original: match[0],
            preAttributes: preAttributes,
            url: url,
            postAttributes: postAttributes,
            content: content
        });
    }

    return linkDetails;
}

// Function to add title attribute to link details
function addTitleAttribute(linkDetails) {
    return linkDetails.map(detail => {
        detail.preAttributes += ` title="${detail.content}"`;
        return detail;
    });
}

// Function to add target="_blank" and rel="nofollow" to link details if the domain is not google.com
function addNewTabAndRel(linkDetails) {
    return linkDetails.map(detail => {
        var domain;

        try {
            domain = (new URL(detail.url)).hostname;
        } catch (e) {
            domain = ''; // In case the URL is malformed
        }

        if (domain !== 'google.com') {
            detail.postAttributes += ` target="_blank" rel="nofollow"`;
        }

        return detail;
    });
}

// Function to replace original links with modified links in the HTML
function replaceLinks(htmlString, linkDetails) {
    linkDetails.forEach(detail => {
        var newLink = `<a ${detail.preAttributes.trim()} href="${detail.url}" ${detail.postAttributes.trim()}>${detail.content}</a>`;
        htmlString = htmlString.replace(new RegExp(detail.original.replace(/[-\/\\^$*+?.()|[\]{}]/g, '\\$&'), 'g'), newLink);
    });

    return htmlString;
}

// Function to add line breaks between direct children of the <body> tag
function addLineBreaksBetweenBodyChildren(htmlString) {
    return htmlString.replace(/(<body[^>]*>)([\s\S]*?)(<\/body>)/i, function(match, openTag, bodyContent, closeTag) {
        var updatedBodyContent = bodyContent.replace(/>(\s*?)</g, '>\n<');
        return openTag + updatedBodyContent + closeTag;
    });
}

// Step 1: Extract link details
var linkDetails = extractLinkDetails(inputData.html);

// Step 2: Add title attribute to link details
linkDetails = addTitleAttribute(linkDetails);

// Step 3: Add target="_blank" and rel="nofollow" to link details if the domain is not google.com
linkDetails = addNewTabAndRel(linkDetails);

// Step 4: Replace original links with modified links in the HTML
var updatedHtml = replaceLinks(inputData.html, linkDetails);

// Step 5: Add line breaks between direct children of the <body> tag
updatedHtml = addLineBreaksBetweenBodyChildren(updatedHtml);

output = {updatedHtml};
Step #14 – File From Text in Files by Zapier
Finally, at this point, we have a pretty usable block of HTML that’s been formatted and ready to upload in Shopify.
It’s not perfect, but someday I’d like to tweak the code until it is. Anything else can be fixed and done by hand.
Now I ask Zapier to take the HTML and create a file using its Files by Zapier app.
The event is File From Text.

I’m inputting the finished HTML from Step #13 and naming the file after the Post Title from Airtable plus the extension “.html”.
With this, we have an HTML file, but we need to store it somewhere to be able to access it.
Step #15 – Upload File in Google Drive
Now I’ll take the HTML file and ask Zapier to upload it to my Google Drive under my client’s folder.

Step #16 – Update Record in Airtable
Finally, I update the status of the Airtable card to “Uploading.”
That way I won’t accidentally trigger the automation again.
Finally, I need to go into my client’s Google Drive and change the sharing settings back to what they were before. I haven’t found a way to do that with Zapier yet.
Creating Drafts in Shopify
I mentioned that the Shopify automation runs on the client’s side. That’s because in order to set up a Shopify automation, I would need admin privileges that I don’t really need or want to have as a content marketer for this client.
So instead of running the automation directly, I have Zapier add the article information to a shared Google Sheet, which triggers the Shopify automation for the client.
But I can share with you how the automation works, because I set up a dummy automation on my side.
It’s a very simple setup. When a new Spreadsheet Row is added to Google Sheets, create a Blog Entry in Shopify.

If you remember, the Google Sheet had these headers:
- Post Title
- URL Slug
- Author
- Blog Post Template
- Meta Description
- SEO Title
- Tags
This is what the trigger looks like:

Note: In order for a Google Sheet to work with Zapier, it needs to have headers on the very first row.
Next, it will Create Blog Entry in Shopify.
The app is Shopify and the event is “Create Blog Entry” (okay, that might have been obvious from the title).
Then we add the information from the Google Sheet into the fields to create the blog post draft.
(I had to take these images from a Loom I sent to the team, since my Shopify free trial has ended.)
- First, you’ll choose the blog from your Shopify account that you want to post to.
- Then pick the Google Sheet field that has the Post Title and Author Name and put those in each field.
- We leave the content part blank for now, since the HTML is too long to be included in a Google Sheet.

- You can add the Featured Image URL, but we do this by hand, so we leave it blank.

- This is what the Excerpt/Summary and Tag fields look like after I’ve selected data from the Google Sheet.
- Finally, for Is Published? we choose “No,” so it only saves the post as a draft.

This way, we can pop into Shopify and open the post, change a few extra settings, add the HTML and featured image, and we’re pretty much done!

Final Thoughts
There are some problems with this method right now.
Problem #1: My Javascript isn’t perfect, and it messes up the Instagram and TikTok embeds that we like to include in posts. I usually have to re-enter these later.
Problem #2: This doesn’t help with adding images to Shopify blog posts. I want to find a way to automatically change the image URLs so that once I upload them to Shopify, they will show up correctly.
Problem #3: Shopify’s Zapier app doesn’t allow us to set the blog post template, SEO settings, or URL slug (yet). Having these settings available would make it SO much easier for us. Shopify, if you’re listening, please update your Zapier app!
But all in all, we’ve saved ourselves so much time. I’m pretty happy with what we’ve been able to do so far!
Do you have any questions about this automation? I’ll be happy to answer in the comments below.
And again, if you can help me improve my code, please let me know!
Finally, if you try this out—tell me how it goes! 🙂